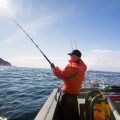
One of the most underrated pieces of fishing gear is the fishing rod holder — and that’s
because, anglers don’t pay much attention to it to understand the actual value
of having a proper fishing gear setup. While it’s easy to come up with a list
of a dozen reasons anglers need to purchase or make a fishing rod holder, it’s obvious
that you need one for trolling, if not for anything else. Worth mentioning is
that a fishing rod holder may come in handy if you’re looking to keep your
hands free while paddling a kayak or doing something else on your boat. With a
good holder, it’s even possible to keep your fishing rod from getting all
tangled up the deck, which is important as it keep you focused on what’s
important, fishing. In whatever you do, you certainly don’t want to waste your
valuable time worrying about how you’ll be managing your gear. A fishing rod
holder is even more beneficial to an angler that’s interested in bank fishing.
The whole point is to help the angler increase their stakes while fishing, and
a fishing rod is among the few things they need to create a perfect setup for
the catching the most fish.
Making a Fishing Rod Holder
You have a much simpler option here, buying one, but why buy one when you can easily make
it at the convenience of your home using readily available materials?
Here are all the instructions you need to make one:
What You’ll Need?
Making a fishing rod holder is a no-brainer. All you need is the following list of items and the
instructions to follow and that’s pretty much like it.
- 4 10-feet pieces of long 1 ½” PVC pipes
- 23 1 ½” T connectors
- 4 1 ½” degree elbows
- A Tape measure
- A PVC hand saw
- A Marker
Instructions
Before we get to the meaty part of this section, you’re reminded that there’ll be a lot
of PVC cutting involved in the process of making the holder. While there exists
other easier solution to cut it, a hand saw is widely recommended for a number
of convincing reasons, but mainly because it makes the cutting procedure a snap
and less effortless.
Step 1: Cutting the Pieces
At this point it’s safe to assume you’ve figured out the most appropriate way to cut
through your PVC. If so, you can proceed to the first step of making the
holder, and which basically involves measuring out the pieces and afterwards
using the marker to determine where the cuts will be made. Read this bearing in
mind that how you cut the pieces will for the most part depend on the number of
rod holders you intend to make. For instance, to make 21 rod holders you have
to cut the rods into 21 14-inch pieces and 28 4-inch pieces.
You’ll also need 4 90-degree pieces and and 23 pieces of T connectors.
Step 2: Assembling the Rack
Assembling the rack isn’t much of a dreaded task. As a matter of fact, you don’t
necessarily need to glue the pieces together if you get them very tight when
you put them on. A good suggestion is to use PVC glue on them if your going to
be up against some strong fish, and don’t plan on needing to take about the
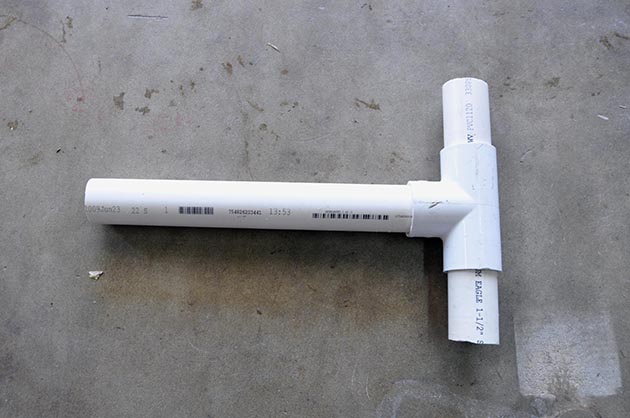
holders. To build individual rod holders, the first thing you need to do is fit
every single one of the 14-inch section into the top facing rod of the T
connector, and a 4-inch piece running through the end as shown in the diagram
below. In other words, just elongate the T-connector using a 14-inch PVC pipe
and a 4-inch one, as shown in the diagram below:
The ends of the 4-inch rod can then be connected to 90-degrees connectors as shown in the
diagram below.
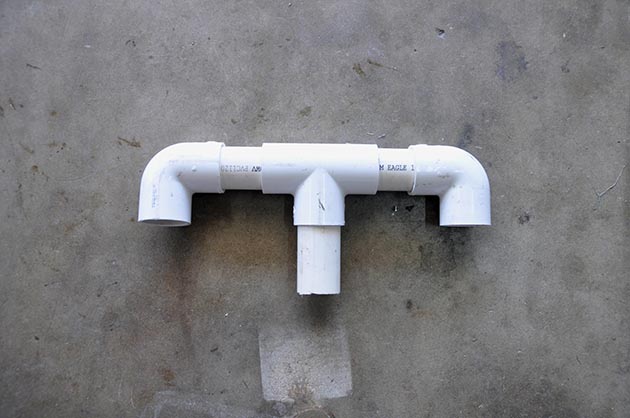
Use a T connector on the middle row, and follow the pattern until you’re able to
achieve something like this:
Step 3: 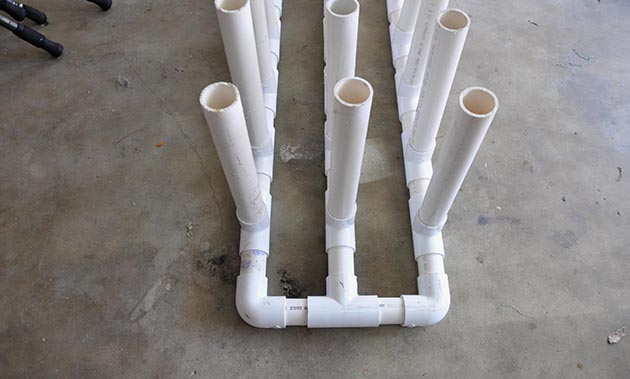 Complete the Assembly
Now continue joining the different pieces together following the same pattern until you’re
able to create a rack that looks like this one by the end of it all.
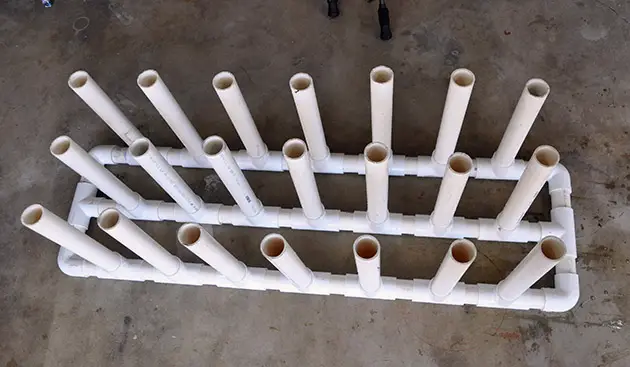
This is the image of what you’re targeting to create by the end of the day. If you’re NOT
planning to increase the number of rods you can place on the holder, you’re
allowed to glue the pieces together to keep your holder tighter and more stable.
Otherwise, you can always disconnect the rack and stick it back with more
pieces any time you wish increase the number of rods the rack holds. That’s
pretty much like it. What remains is for you to load up all your rods into the
holder and you have a complete fishing rod holder to bring with you whenever
you go fishing. The rack is built with a one and half pipe because the size can
accommodate any butt diameter of a bass rod. But to be on the safe side, you’d
want to begin by measuring the butt of the largest rod you’ve got in your
fishing gear to accordingly re-adjust the size the pipe you choose. That’s the
part where common sense kicks in, but where you have to choose a PVC pipe of a
different diameter, you have to as well consider adjusting the size of the T
connectors and the 90 degrees connectors so they can snugly fit into each
other. Where you’re using a storing jig stick, you may want to go with a 2-inch
PVC pipe instead of the original 1.5-inch PVC.
The Takeaway
There’s not enough insistence as to why making a fishing rod holder is among the smartest
decisions you can ever make as an angler. Whether you fish from the shore or
boat, you’ll need the holder to multitask and keep your hands free while you’re
out fishing.
A fishing holder also gives you the opportunity to run more than one fishing rod at a
time so you can be able to catch even more fish. And the best part is that,
building one from scratch is no rocket science. Just follow the simple guide
provided exactly as is and we can almost guarantee you’ll be able to pull it
off without missing out anything important.